12_04

Cartridge Showcase: 9 Months


"Hey everybody.. Jamie L. here with today's Cartridge Showcase. I have chose to showcase Cricut Lite 9 Months. This cartridge is just adorable! I love this cartridge. Now this cartridge mainly has cuts for pregnancy and I probably wouldn't have gotten it if I didn't just recently have 2 babies (one 2 years old and the other 6 months old). 


But you can make lots of stuff with this cartridge.. scrapbook pages, cards, mini albums, all sorts of gifts for someone having a baby.. This cart does have a few cuts that are kind of general and don't even need to be used as baby related including a bird, a bee, different foods, soda, car, suit case, hello my name is tag, elephant, Caterpillar & more. 

Now this is a lite cartridge so it only has 4 different features, but its still adorable! This cartridge is sold at Walmart, Cricut.com & ebay. 


Here are some of the projects I've made with this cartridge...
My Pregnancy scrapbook layout.. I made this with just the title cut, bakers twine and some photo mats very easy to make page that turned out super cute.


Ultrasounds 2 page scrapbook layout.. I cut the ultrasound title in white on both layers and then colored it with black chalk and rubbed it with my fingers to make it look kinda like an ultrasound. some thing witht he little ultrasound image cut. Added some patterned black and white paper for the photo mats. I wanted everything on this 2 page layout to be black, white and gray to match the ultrasounds.


Onesies layout.. I cut some onesies and used them as stencils and sprayed purple card stock with some wine berry glimmer mist. then I took the onesies that I used as stencils and used them as embellishments with pop dots to make them stand out a bit. I used patterned paper to make the mats.


Umbrella layout.. this is a layout for pics of my daughter in the rain with a yellow umbrella. For this I used some of the umbrella cuts and inked over them with yellow ink on the yellow paper making a background of umbrellas on the yellow page. Then I used pop dots and put down the umbrellas and added white stitching on them with a gel pen. The title and raindrops were madeI with white puff paint.

And of course we couldn't forget the most adorable thing I've made so far.. These shirts. First I cut out some plain brown cotton fabric and some Wonder Under. I ironed the Wonder Under to the fabric by following the directions on the Wonder Under. Then I put the fabric & Wonder Under on a fresh mat and used my Gypsy to make sure I had the cuts in the right spot.. And cut out the little bird thats part of the onesie. I cut 6 total.. 4 smaller and 2 larger. Then I peeled off the paper backing and ironed the fabric to 2 different plain pink onesies & I hand cut the letters. 


I put these into my baby girls' Easter baskets :). These were really easy to make it took me maybe 20 mins total from start to finish (not counting cutting out the letters by hand). 

I cannot wait to make more pages for my girls' scrapbooks with this cart it's really cute. And perfect for someone who wants to work on anything pregnancy related. 

Thanks for checking out my showcase I hope you enjoyed my projects!


Jamie, Thank YOU for such a wonderful showcase. This cartridge is full of some great images and your inspiration makes me want to run out and add it to my collection!


Please be sure to head over to Jamie's blog and leaver here some love. DIRECT POST LINK


Come back tomorrow as our PCW designers share some great projects they have been working on!


Have a wonderfully crafty day!
-CWC and PCW Designers

Home Décor or 3D Hop Day 2

Good morning crafty friends!

So glad you could join us once again for our Totally Terrific Two Day Home Décor or 3D Blog Hop! 
There are TWO DAYS with DIFFERENT DESIGNERS and DIFFERENT projects each day! PLUS we have a challenge and some great blog candy to give away too! In case you missed yesterday’s line up....simply CLICK HERE to go to yesterday’s post and check out the amazing work yesterday’s team did!


Here is the line up for today SUNDAY
Melin - http://www.cookingwithcricut.com/ You’re HERE
Becky - http://www.scrapcircus.blogspot.com/ Next STOP
Sharon - http://www.sharonscraftycards.blogspot.com/
Madison - http://www.funkycards.blogspot.com/
Marji - http://www.fstampaholic.blogspot.com/
Jamie A. - http://www.scrapqueen141.blogspot.com/
Christel - http://www.onescrappinsista.blogspot.com/
Linsey - http://www.linseyrickett.blogspot.com/
Evelyn - http://mylittlecraftblog.wordpress.com/
Court - http://www.courtscraftcorner.com/
Melissa - http://www.craftygator.blogspot.com/
Jamie L. - http://www.babyjaydensmommy.blogspot.com/
Jenny J. http://www.crazyaboutcricut.blogspot.com
Kimmi - http://www.impressivelyyours.blogspot.com/
Jen - http://www.gator-4-life.blogspot.com/


So here is what I made for today. As a Christian, I am trying to reconnect with the Hebrew roots of our faith. I consider myself a crossed-over Hebrew. My Savior was a Rabbi and He taught us to keep the principles and teachings of the Word. One of those principles is the counting of the Omer. This is the time when you set aside some time each day to read a passage from Psalm 119 and reflect upon that. It is the 50 days between Pesach...Passover and Pentecost. It is a truly humbling experience. Did you know that Psalm 119 is the longest chapter in the Bible? Did you know that each little subsection is entitled with a letter from the Hebrew Alphabet....Yep this is OUR BIBLE....Our TORAH :)  So to keep track of this, I decided to create a box where I could print off the scriptures and keep them on the table for everyone in the home to take and read. Sometimes it is such a revolving door around here with school and work that at least everyone can do it on their schedule.
rectangle frame flourish svg

Here's how I made it.
 
I started with the plain box that I picked up at Michael's for .99. I printed out two sheets of the Exhortation background digital printable I created on cream colored paper. See below for free download.


Next I measured the top and all the sides and cut the paper to each side. I inked the edges of the paper with some QQ Amaretto Chalk Ink. I adhered all the paper to each panel.

I then punched out a strip of the same paper with my MS punch. I punched out on both sides of the strip. I inked the edges of them and adhered them to each corner. This was to give the appearance of some "hardware" but really to keep the edges of the paper from curling over time and use.

Here is a close up of the "edges".


Next, I cut out the Flourished Box Top-Rectangle Frame file that I created. I inked it very heavily to give it that vintage look. See below for free download.

Then I printed out the scripture Psalm 90 verse 12 and then cut it out with my Pazzles. I Inked that and adhered it to the box top. See below for free download.

Lastly, I added some Prima Flowers and some butterflies cut from my MS punch.

So what would a hop be without some wonderful blog candy!!!

There are several prizes and a few different ways to win!!!
* Leave A Comment
* Like Our FB Page CLICK HERE
* Join Our Challenge
(be sure to be a follower of the blog to be eligible)

Leave a comment on this post, yesterday’s post, one or the other or both and you will be entered to win the following:
pcw-20-gv-400_thumb1
$20 Dollar Gift Voucher Download from PaperCraftingWorld.com

A Quick Quotes Prize Pack. This includes the Savvy Davvy Paper Pack featuring 12 double sided cardstock weight papers and 10 vellum quotes! Please note: This only ships within the United States.
savvy-davvy-paper-pack_thumb1

Plus, Leave a comment on this post AND like our Facebook page: HERE
and you could win a $15 dollar gift certificate to Page-Kits.com. Please note: This only ships within the United States.
PKBLINKIE8_thumb

Join our Home Décor Challenge and link up your home décor project below and you could win. Just link up on yesterday's post or below this one.
pcw-15-gvoucher_thumb2
In order to be eligible for any of these prizes, we only ask that you be a follower of our blog and “like” us on Facebook for the Facebook prize :)


Now how about a little something for everyone....Here are a couple of FREE files for you to enjoy. Be sure to download them today as they will only be available through today!
Psalm 90-12 Digital Printable
Click Button and add to cart. It will not cost anything to download today.


Exhortation Background Digital Printable.
Click Button and add to cart. It will not cost anything to download today.


Box Top - Rectangle Flourished Frame Cutting File.
Available in: AI, DXF, EPS, GSD, KNK, MTC, STUDIO, SCAL2, SVG and WPC formats.
Click Button and add to cart. Sorry Free File Expired. Only $1.00 to purchase.


Now on to the wonderfully talented Becky to see what she has in store for you!


Home Décor or 3D Hop-Day 1

Good morning crafty friends!
So glad you could join us for our Totally Terrific Two Day Home Decor and or 3D Project Blog Hop! 


Grab a cuppa joe..or in some cases...some tea and hold on to your hats!!!!! We have TWO DAYS with DIFFERENT DESIGNERS and DIFFERENT projects each day! PLUS we have a challenge and some great blog candy to give away too! So let’s get started!


Here is the line up for today SATURDAY
CookingWithCricut.com: YOU’RE HERE
Jill - http://www.jaihart.com/  NEXT STOP


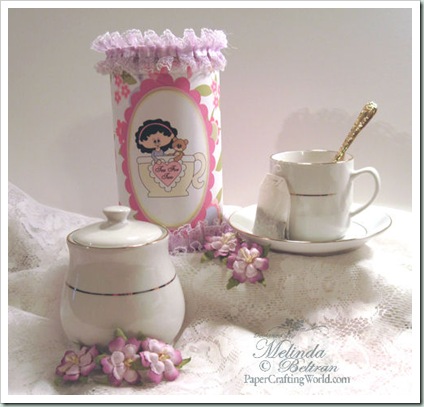
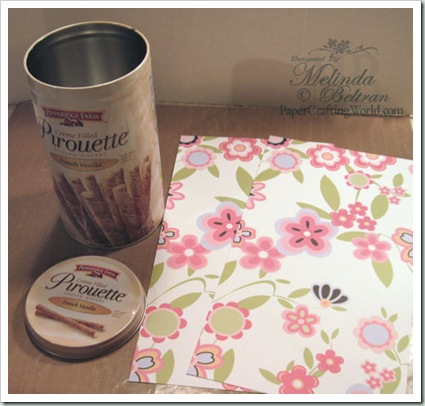
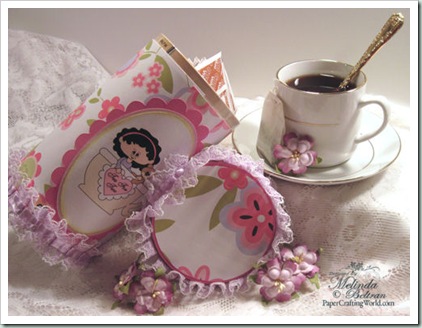
So here is what I made for today. My project is for one of the things I truly enjoy. Since moving here to the south from Michigan, I have acquired quite a taste for some tea....LOVE IT! In the winter, I love a warm cup of tea. In the summer some Iced tea is the BEST! Now, I used to make it....break your teeth sweet, but I have learned to back off the sugar considerably and I can even drink it unsweetened now...Yes...for me that’s an accomplishment...lol. So I decided to alter this can and keep it on my kitchen counter. It will hold my tea bags and bring a little pleasure.
tea container svg 500

tea svg container 500
I used a canister from some wonderful Pepperidge Farm Creme Filled Vanilla Wafers. I saved the can from the holidays.
covered w seam 500
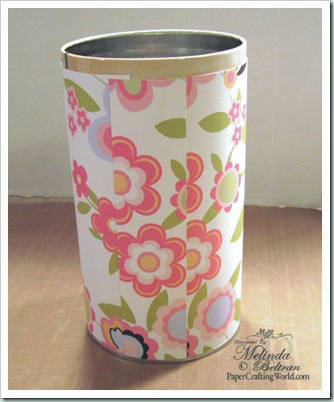
Here is a shot of the can covered with the paper. It was just a little too big for a 6.5 x 12 piece to fit the circumference so I had to add a 1.5" piece in. I then cut the scalloped oval and the digi doing a "print and cut" method and glued them to the can. I covered the "seam" with the oval and scallop so the rest of the can would look seamless. The biggest thing was gluing the scalloped and oval set good enough so that it laid flat on the curve.
svg tea container open 500
Here is a shot of the container with the top open. I cut a circles at 3.80 and 3.70 and it covered the top nicely. I simply added some lace to the edge of the bottom and the lid and that was it. Super simple and yet pretty.


So what would a hop be without some wonderful blog candy!!!

There are several prizes and a few different ways to win!!!
* Leave A Comment on this post
* Like Our FB Page
* Join Our Challenge
(be sure to be a follower of the blog to be eligible for any of the prizes)


Leave a comment on this post, tomorrow’s post, one or the other or both and you will be entered to win the following:
pcw 20-gv-400
$20 Dollar Gift Voucher Download from PaperCraftingWorld.com 

A Quick Quotes Prize Pack. This includes the Savvy Davvy Paper Pack featuring 12 double sided cardstock weight papers and 10 vellum quotes! Please note: This only ships within the United States.
savvy davvy paper pack

Plus, Leave a comment on this post AND like our Facebook page: HERE
and you could win a $15 dollar gift certificate to Page-Kits.com. Please note: This only ships within the United States.
PKBLINKIE8

Join our Home Décor Challenge and link up your home décor project below and you could win
pcw 15 gvoucher
In order to be eligible for any of these prizes, we only ask that you be a follower of our blog and “like” us on Facebook for the Facebook prize :)

Lastly, how about a little something for everyone....Here are a couple of FREE files for you to enjoy. Be sure to download them today as they will only be available until tomorrow’s post!

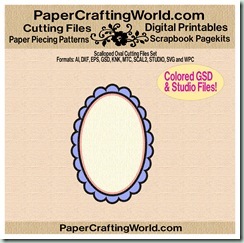
Scalloped Oval Cutting File. 
scalloped oval-jpg
Just use the "add to cart" button and check out. You will not be charged.


Tea For Two Digital Printable Stamp.
Just use the "add to cart" button and check out. You will not be charged.


Now on to the wonderfully talented JILL to see what she has in store for you!


Be sure to come back tomorrow for Day 2 for another great round of designers and projects!


Winners Announced


Welcome to Cooking with Cricut
Today we would like to announce the winner of Challenge
#81- Card Outreach. The winner of the Top Chef prize was chosen by Random Organizer.
The winner is...Cindy-  Pink Lady's Paradise
Congratulations Cindy:)

Cindy created this sweet card using the Just a Note Cricut Cartridges which comes preloaded on the Expression 2.  You can "pick up" your top chef button on the left column and proudly display it on your blog.  As the winner Cindy will receive her choice of digi stamp or cutting file from Papercraftingworld.com

Cindy, please contact Madison at FunkyCards @Charter .net (no spaces) within two weeks to claim your prize.

The Top Three Chefs were chosen by the Cooking With Cricut Design Team. You can "pick up" your top chef button on the left column and proudly display it on your blog. 


Send a letter:  This week we are designing projects with letters.  How about making a card that you can send to someone?  Once again you have until next Tuesday at midnight to post your projects. One winner chosen at random will receive his or her choice of digi stamp or cutting file from Papercraftingworld.com.

Have a wonderful day!
~Madison - Prize Coordinator

Cartridge Showcase: Tags, Bags, Boxes and More 2


What a Great Cartidge! You have really got hooked up today! Java Jen is hear strutting her stuff! She has cooked up not one, not two, but three projects for you using the very new Tags, Bags, Boxes and More Cartridge! Without further ado....... here she is!


Hello everyone and welcome to another Cartridge Showcase here at Cooking with Cricut! This is Jennie B. (aka Java Jen), and I'm showcasing some projects from Tags, Bags, Boxes and More 2.


I really do love this cartridge, but I have to tell you that there is a bit of a learning curve in using the scoring tool! This is definitely something I'll have to take more time working on! I'm hoping to do a video on this soon because I know there are more people like me who need some help with this cartridge! :-) 


TBBM2 is a full cartridge that has lots of shaped boxes, tags, cards and card phrases. This cartridge is designed to work with the Cricut scoring tool and the Cricut gel pens. 


My first 2 projects are cards. I love how many different cards there are on this cartridge! The cupcake card is on page 56 of the handbook and the circle flap card is on page 72. (Sorry for the messy pic of the cupcake card - I dropped it when the Stickles were still wet!) :-(


 I backed the cupcake cut-out with bright pink paper so it would show through easily. This card is cut @ 5". I tried the scoring tool to see how it works and this is how I made it work. After cutting the card, DON'T unload your mat. If you are using your Gypsy, touch RETURN TO DESIGN and click SHIFT for the image you are wanting to score, making sure that your cursor is set to the same size as your cut image. Line the score lines up on your original image, (if you are using a Gypsy.) I'm going to try this on my E2 to see exactly how this will work. I'll post details on my blog as soon as I do that! :-) Once you have the lines matched up, replace the cutting blade with the scoring tool and press CUT again. It will simply go over the cuts again and score where needed. Can you see why a video on this would be helpful! :-) 


On to my second card - This is Circle Flap card and I see so many possibilities for this design! It would make a great party invite! First pic shows it closed, second one open.


I didn't go crazy embellishing these projects since I was mainly trying to learn how this cartridge best works.


This next box is one of the big reasons that I got this cartridge! I made a mini pizza box and cut it at 6.5".


I definitely need more practice using the scoring tool for this cut, so I just referred to the instruction booklet that comes with this cartridge. It shows where the score lines are.

I think this little box would be perfect with a decorated cookie in it or even a gift card! I have so many ideas for this box! :-) I was also thinking it would be great to make it like an 8" square and make up card kits and package them in these boxes for a craft night at my house! :-) So many possibilities!


Lastly, I made the Tea Bag holder. I cut it at 5" which is a little big but it actually works for a Family Size iced tea bag! :-) It has just enough dimension for a tea bag to fit snugly inside! 


I hope you have enjoyed this exploration of TBBM2! I know that I have a lot to learn when it comes to using this cartridge to its fullest, but I WILL learn it! :-) 


Now, go create your own masterpiece and show the world!


Jennie B.

(Java Jen)


Come on, you have to admit it! She did a fabulous job showcasing this cartridge! I think I need to stop looking at all of these showcases, because every Monday and Thursday I end up wanting another cartridge!

Craft On,
~The CWC Team