10_10

Happy Sweetest Day! - FREE Cutting & Digi Files

Good morning everyone!
Happy Sweetest Day!

I am so glad to be back to some regular posting....let's say a prayer and keep our fingers crossed that my computer will continue to co-operate :-)

In honor of Sweetest Day, I wanted to thank all of you for your faithful support of this blog. Especially the new Design Team Members!

They have worked really hard to begin to bring you some fun challenges. PLEASE, PLEASE, PLEASE...Go to this week's challenge and leave a comment for them AND.....PARTICIPATE...It is an easy, peasy challenge :-) If you leave them a comment, you could win two cutting files or digital stamps from Page-Kits.com.

But to sweeten the pot....If you leave a comment on the challenge post from this week HERE, AND one on this post....one lucky commenter will win this adorable cut file or digi stamp (winner's choice) that I just created....This cute little bear with a box of chocolates :-) Just asking three things:
  1. Be sure to be a follower of this blog
  2. leave a comment on this post AND
  3. Leave a comment on the CHALLENGE POST: HERE.....
That's it. That's all I ask. Let the girls know you've seen and appreciate their wonderful work :-)

Okay, so now on to today's projects and FREE cutting file and digi stamp.

Here is a layout I made a couple of years ago. It was pretty clean and straightforward. I used some Basic Grey patterned paper that was so pretty.

The BG paper inspired me to create this wonderful rose piecing. Here is a closeup of th rose. I cut all the pieces of the rose (except the leaves) out of white cardstock. I then inked and chalked the "inner" pieces. I left the background part completely white. I then assembled the rose and used some Stickles to "Outline" the rose.

Now here is the same rose, converted into a Digital Stamp.
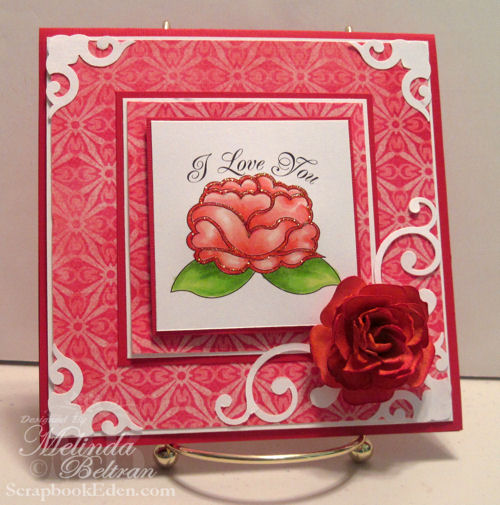
I used my Copic markers to color the stamp in and then used some Stickles to Outline it. I used a couple of EK punches for the corners and flourishes and I used my Cricut for the dimensional flower. If you would like to know more about the dimensional flower, just go to yesterday's Fantabulous Friday post and get the info....you can go HERE

The digital stamp set comes in pdf with four different sentiments. It also has the plain rose (no sentiment) in jpg format. The cutting file comes in the following formats: AI, DXF, GSD, MTC, KNK, SVG, SCUT(scal 2.0), WPC and WPC 14.
If you would like the FREE Digital Stamp set: CLICK HERE
If you would like the FREE Cutting File: CLICK HERE
Be sure to grab them quickly as they will only be available for FREE until Sunday night (tomorrow, Oct. 17th) at midnight (eastern) time.

50 States Flower Review

Good morning everyone!
Today I am "Exploring" a cartridge...this weeks lucky cartridge is.... Mr. Classmate himself....50 States
Yes, this studious little cartridge has been around for quite some time. I must admit, if he had been released this year with all the other TONS of Cartridges, he probably would have been "kicked to the curb". He was definitely marketed to the education community. And the packaging made it a little hard to think beyond the 50 states shapes, flags and the educational needs he would meet.

BUT...if you look beyond all that, he has some little gems stored within the "prongs" of his case.

Today I am not focusing on anything but the FLOWERS! Yep that's right....the FLOWERS. So here are a few...not 50, just a few flowers I was able to come up with by working with this little fellow.


The Yellow Flower

This is the "Kansas" Flower on Page 28.I cut him in 4 different layers and at 4 different sizes. I then cut "slits" to make the individual petals. I then "Fluffed" the petals up to give it the dimension.This flower looks a bit like a Carnation or it could be a sunflower.

Check out the tutorial on this flower HERE


The Pink Flower

This is the "North Dakota" flower on page 46. I cut this flower in 4 layers in 3 different sizes. I cut "slits" so the petals would be a little more loose. To me this one looks like a rose.
Check out the tutorial on this flower HERE.


The Purple Rolled Flower

This is the "Ohio" flower on page 47. After cutting this flower out, I cut a slit to "open" up the flower. I then glimmer misted it and rolled it. These are much like all the other "rolled" or "lollipop" flowers that have been floating around the net most of this summer....Who knew...they were tucked away all this time in our little cartridge :-)
Check out the tutorial on this flower HERE.

The Red Flower
This is the "IOWA" flower on page 27 and the center set is the "North Dakota" one. For this one I did use my Gypsy to "hide" the center cutout. But I think you could still achieve this look without doing that. I did, once again, cut the petals "loose" so they would have more play. After glimmer misting, I waited until it was just about dry to "shape and sculpt" the petals. This is just a matter of sitting down and playing with the petals until they look the way you want them to. Crazy thing is: once the glimmer mist is completely dry, the paper gets pretty hard and so these flowers keep their shape really well.


The Orange Flower

This is the "Maryland" flower found on page 32. I cut out the flower option that had two cut at the same time, one with a circle cut out and one without. I then once again cut "slits" so the petals would be loose. I then staggered the layers starting with one that had a hole so that the top layer would be a solid. I then curled the petals just before they were dry.


The Teal Flower

This last beauty is the "North Carolina" flower found on page 45. For this one, I simply cut 3 flowers two at 6" and one at 5". I then glimmer misted and then layered them by "mirroring" them. I then "shaped" the flowers just before the petals were dry to give it dimension. I finally layered the 3 centers and "fluffed" them and added a touch of sparkle to it.

Yep...that's right, all these beauties were created with the 50 States Cartridge. I don't have them on any projects yet, but they are now a part of my flower stash and ready to go at a moments notice :-)

BONUS PROJECT
Here is a card I made last year. I used the same techniques for this flower as I did for the others. With this one though, I did three different colors of glimmer mist to give the flower petals a more varigated look.
Here is a closeup of the flower.

If you would like the flower cutting file below: Please sign up for my newsletter and become a follower and I will be sending the link out in Sunday's newsletter. PLUS another flower too :-) The newsletter will go out Sunday evening. It will be available in the following formats: AI, DXF, GSD, KNK, MTC, SVG, SCUT(Scal 2.0), WPC and WPC14.

AND LAST.... A FREEBIE FLOWER I WHIPPED UP :-)
You can download the zip file: 
The zip file contains the following format: AI, DXF, GSD, SVG, SCUT(scal 2.0), MTC, KNK, WPC and WPC14. Remember to snag it while you can....it will only be available FREE until Sunday at midnight :-)

Thank you for joining me today! I hope you were inspired to make a whole bunch of "pretties"
-Melin

fnl2g101112

Free Newsletter Subscriber Only Digital Stamp
Free for approximately One Week.
No longer available.
Go To PaperCraftingWorld.com for our great, afforadably priced cut files and digital stamps.

Latte Cheer Card

Good morning everyone,
Here is my project this morning for my Pile It On Design Team challenge. Our challenge this week was to use things in 3's.  We were also provided with this cute digital stamp from Fresh Brewed Designs. Be sure to hop over to PIO and FRESH BREWED to see what the other DT members have "brewed" up for your creative inspiration.  Also be sure to join in the fun!
So the things I did in 3's
  • 3 Colors of cardstock
  • 3 Prima Flowers
  • 3 Blue Square Blings
  • 3 Different Colored Stickles (Red, Diamond & Cinnamon).
The challenges my project applies to:
PIO - Things in 3's - Fresh Brewed Design
A Spoon Full of Sugar- Sparkle and Shine
Fab N Funky #43 - Use Digi Image
Pollycraft - Anything Goes
Corrosive - Clean up the Dust (Primas)
For Fun Challenges – Dust Collector (Primas)
Crazy 4 Challenges - Birthday

STAY TUNED! I will be back a little later with my project for this week's FCCB challenge :-)

Breast Cancer Awareness DT Member Project

Good morning Everyone,

Today I am showcasing a project from one of our new Design Team Members. This wonderful card comes from Christel Bonner. She is taking part in a Breast Cancer Awareness Blog Hop. So please be sure to stop over and show her a little love. You can hop over to her blog: HERE

Here is Christel's Card. She did a wonderful "Flip Flop" card. She used one of our new digital stamps...Fight Like A Girl. For details on this digi stamp: Click HERE


If you would like to win this digital stamp, you have two chances.
  1. Leave a comment on this post and be a follower of this blog.
  2. Hop over to Christel's Blog and leave a comment on her post HERE
We will pick a random winner for each blog. I will announce the winners here on the 12th.

Be sure to check out yesterday's post for some great ideas using the Celebrations Cartridge!

Celebrations Showcase

Good morning everyone,
It certainly has been a while since I have posted. I do apologize for my absence. I had computer problems...major and then had a very busy schedule and had to try and play catch up. But I wanted to get right back into the swing of things. I am a design team member over at Fantabulous Cricut Challenge Blog. I just became the new Fantabulous Girl Friday over there. This means each week I will be posting a segment exploring our Cartridges, Cutting files and More. So here is this week's first Cartridge. The honors go to.....Ms. Celebrations Cartridge herself!
Most of us have her in our collection of bug juice and she has been around for quite some time.
So I figured I would dust her off and take a closer look at her :-)

Birthday Girl Layout
Here is a layout I made using Ms. Celebrations herself. This is along the lines of what you would expect from this great cartridge. I made ALL the elements using just the Celebrations Cartridge. The scalloped yellow background was cut using the "Fit to page" button and scalloped sqaure found on page 122. The cupcake, balloons, presents and girl title also came from this wonderful cartridge.

Now let's think outside Ms. Celebration's box a bit. Here are a few projects and ideas I came up with that weren't necesarily balloons, gifts, candles and cakes.

Prayer Booklet
I used my Gypsy and my Celebrations Cricut Cartridge to create the "pages" of the book. The inside pages measure approximately, 2.75" wide by 3.55" high.
The flowers and the "flourishes" on both of these pages were also created using the Celebrations cartridge. The flowers are from page 121 and the "flourishes" are from page 104.
You can download the free journaling and scripture tags pdf file at the bottom of this post.

SWEET BOY LAYOUT
Here is a layout I made using the Celebrations cartridge. ALL the die cuts are from Ms. Celebrations...Yep that's right...ALL.
Aside from a few sentiments, like the "Boy" title, this cartridge doesn't have a font. So I used numbers to create the title "Sweet". The "S" is the curly number 8. I welded the three 3's together for the w, e and e. The t is from the number "4". After the Cricut was finished cutting my Gypsy file, I still needed to trim part of the 8 away as well as part of the number "4" to achieve the finished "Sweet" title.
Now about this lamb....
He is totally from the Celebrations cartridge. Can you get your bug juice going and figure him out? If not, that's okay, be sure to sign up for my email newsletter. I will be sending one out Sunday late afternoon-evening and will have the full cut instructions link on it :-)

Lastly, How about some 3 dimensional flowers.
I made these beauties using my Celebrations cartridge and my Gypsy. Which by the way, if you don't have a Gypsy, I think you could still make them.
I would show you the project these are going on....but then I would have to make you an offer you couldn't refuse....lol! But if you come back on Monday, then I will give you the skinny on these cute "fringey" flowers and the Gypsy file too!
Be sure to visit back tomorrow as I will be sharing a project from one of our new DT members in celebration of Breast Cancer Awareness.
Now for the FREE stuff:
For the Prayer Booklet Gypsy File: CLICK HERE
For the Prayer Booklet journaling and scripture tags: CLICK HERE
For the "Sweet" Gypsy File: CLICK HERE
For information on re-creating the little Lamb:
Be sure to sign up for my newsletter and you will get the link to the pdf download....sorry haven't had time to complete it for this post. So that is how I will get it into your hot little hands.