14_04

Stamped Sunflower Card

Hello crafty friends,
I hope you are enjoying a great day and maybe even enjoying some crafting. Today I am sharing another card I created with a couple CTMH stamps. Before I share my project, for those that are following along with the counting of the Omer and reading along with me, here is today's reading.


Beth

9 How can a young man cleanse his way?

By taking heed according to Your word.
10 With my whole heart I have sought You;
Oh, let me not wander from Your commandments!
11 Your word I have hidden in my heart,
That I might not sin against You.
12 Blessed are You, O Lord!
Teach me Your statutes.
13 With my lips I have declared
All the judgments of Your mouth.
14 I have rejoiced in the way of Your testimonies,
As much as in all riches.
15 I will meditate on Your precepts,
And contemplate Your ways.
16 I will delight myself in Your statutes;
I will not forget Your word.
Psalm 119: 9-16
Blessings as you read and meditate on His Word.

So now onto my card for today.


ctmh-sunflower-card-480
Here’s a look at my completed card. It is an A2 (4.25 x 5.5) size. I started by taking a piece of Kraft cardstock and stamping the stripes using the In the Background stamp. I used Chocolate inkI then repeated this step on a smaller mat.


background stamped-480

backgrounds stampedboth-480

I set those aside and began working on my flower. I stamped several petals in Crème Brule ink and used one of the “petal” stamps from the Just for you set. I created SVG die cut files for this set so stamping several at a time and having them pre-cut was fast and easy.


flower base1-450
I created the base by using a 1 1/2” circle. I positioned the petals as pictured above.

flower base2-450
I then added another set of petals underneath the first four and placed them offset as pictured above. I set this layer aside.


flower center1-480
Next I took a 1 1/2” circle and stamped to create the center of my flower. I started by using the circle stamp in the stamp set and inking it with Chocolate ink. I stamped in the center of the circle. See photo above.

flower center 2-450
Next I stamped on the top and bottom of the circle. See photo above.

flower center step3-450
Then I stamped on each side of the bottom stamped image. See photo above.

flower center finished-450
I repeated the last step on the sides of the top stamped image and this completed the center. After stamping. I added petals to this circle in the same fashion as the base layer. There should be a total of 8 petals on this layer.

finished flower-450
To complete the flower, I simply layered the stamped image layer flower set on top of the bottom larger layer. This gives you a total of 16 petals and makes the flower nice and full.


sunflower closeup-480
Once the flower was completed, I added some stamped leaves and adhered it to the card.

sentiment closeup-480
I added a sentiment and used my EK photo corner punch to punch out some photo corners. I just used the same center circle stamp and stamped on some cardstock and then punched the photo corners out. This gave the photo corners an extra decorative touch.


ctmh-sunflower-card-480
Here is one last look at the completed card.

Products Used for this project
pazzle1
Pazzles inspiration
CTMH-b1398 just for you-200
Just For You Stamp Set
CTMH-d1540-in the background-200
In The Background Stamp Set

chocolate-200
Chocolate Ink Pad
creme brulee ink-450
Crème Brulee Ink Pad

pear-200
Pear Ink Pad
kraft cardstock-200
Kraft Cardstock
white cardstock-200
White Cardstock
mini corner punch
EK Mini Corner Punch

Are you interested in the cut files I created for this stamp set?
just for you stamp set-480
 Spend a minimum of $10 through my Close To My Heart gathering link and I will send you your choice of two of the cut file sets.
Spend a minimum of $25 and I will send you your choice of four of the cut file sets.

Here are the sets I have created so far.
CTMH c1574-Believe in Yourself-200
Believe In Yourself
CTMH-c1537-sweet-as-honey-200
Honeycomb 
Sweet As Honey


CTMH-C1575-True to life-200
True To Life
CTMH-b1398 just for you-200
Just For You

CTMH-c1570-hello-blooms-200
Hello Blooms
CTMH a1153-hpe-200
Hope

Lastly, Don’t forget the fantastic special Close To My Heart Is running this month.
april-2014-campaign-480
PLUS, I will be giving the cut files I create for the stamp sets for FREE to those who join through me. Have any questions, please feel free to contact me: melin(@)scrapbookeden(dot)com.

Well, that about covers it for today. As always, thank you so much for sharing your crafty time with me. Until next time,
2013 fall winter melsig-450

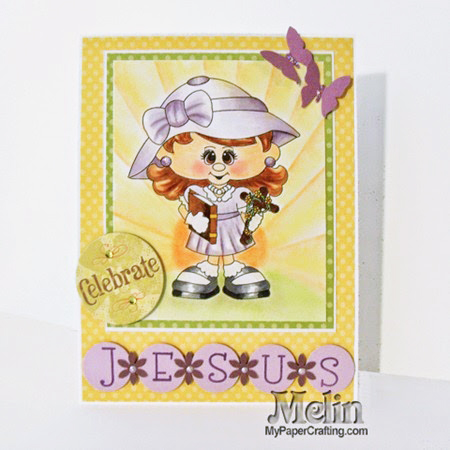
Celebrate Jesus QT P Card

Hello crafty friends,
For those in the United States, Happy Resurrection Sunday! I hope you and your loved ones are enjoying a season filled with wonderful festivities as we celebrate the Passover and Resurrection of our savior. I wanted to create a project commemorating this event. PLUS, for those who are returning to the Hebrew roots of our Christian Faith. Today begins the counting of the Omer. 

The Counting of the Omer covers a fifty-day period of time from the 
Feast of First Fruits until Shavuot (Pentecost). Beginning with the 
day of First Fruits, each subsequent day is counted for 
seven complete weeks, plus one day - fifty days.

During the Counting of the Omer, we "count up" to the 
Feast of Shavuot (the 50th Day) with each day of counting,
adding to the growing expectation of what Pentecost will bring.

During the Counting of the Omer, each day 
a verse from Psalms 119 is read and meditated upon, 
causing us to review the condition of our hearts before God.
-Rabbai Messer


Day One - Psalm 119:1-8

1 Blessed are the undefiled in the way,
Who walk in the law of the LORD!
2 Blessed are those who keep His testimonies,
Who seek Him with the whole heart!
3 They also do no iniquity;
They walk in His ways.
4 You have commanded us
To keep Your precepts diligently.
5 Oh, that my ways were directed
To keep Your statutes!
6 Then I would not be ashamed,
When I look into all Your commandments.
7 I will praise You with uprightness of heart,
When I learn Your righteous judgments.
8 I will keep Your statutes;
Oh, do not forsake me utterly!


So here is what I came up with. The main picture is a digi from PaperCraftingWorld.com called QT Patootie Bible Becca. I colored her with my Copic Markers. To make the sunburst background, I used some Pebbles Chalks and a simple technique described below.


To create the background: I started by chalking some green for the bottom and then some orange to simulate the sun. The one thing I would say about using chalk is that you can erase it. So the parts you see where I went over, at the end, I can clean up.


After creating the grass and orange, I took a scrap piece of paper and made a line with the chalk. I used the scrap piece as a mask. I made the bottom point in the center of the “sun” As you move the scrap piece to the next point, be sure to keep the bottom point in the same location.


Here is what the first sun beam stripe looked like.


Continue doing this all the way around. Once you have all your stripes in place, you can go back and color in with the varying shades of chalk. I used a lighter orange and yellow to finish coloring the background in.


Here are my two little punched butterflies. I added some Stickles to the centers.


This is a close up of the Jesus title. I stamped the letters with some Gypsy Ink Pad and used the You Are My Happy Alphabet set. I punched out some tiny EK Success Daisy flowers and added some Lavender Lace liquid pearls to the centers.


Lastly, I added some stickles onto her earrings and on her necklace.

Here is one last look at my card.

Here are the products used for this project
PCW QT Patootie Bible Becca Digi
CTMH Dotty For You Polka Dot Paper (Retired)
CTMH You Are My Happy Alphabet Stamp Set (Retired)
EK Success 5/8” Circle Punch
EK Success Mini Daisy Punch
Lavender Lace Liquid Pearls
Star Dust Stickles
Copic Sketch Markers: BV0000, BV000, BV00, V20, V25
Y19, E13, E15, E35, E37, E59, W00, C4, C6, C10
White, Lavender and Plum Cardstock
Misc. Chipboard Element

Well, I think this about covers it for today. Be sure to come back tomorrow as I share another fun project. Until then,

Spring SOUS Die Cut Challenge

Hello crafty friends,
Today is the start of another challenge over at SOUS Stuck On U Sketches Challenges. This time the die cut team was tasked with creating a project with a “Spring” theme. So here is what I came up with.


I started by creating the base of the mat using the In The background striped stamp using the sky ink pad.

stamp closeup-480
Next I stamped the  Hope stamp sentiment with some white ink. I cut out the matching white mat layer with my Pazzles. I created a matching cut file set for this stamp. I colored in parts of the sentiment with my colored pencils. I then added some bitty sparkles.
  
tulips closeup2-480
I cut out the Tulips in white cardstock and then sponged some ink onto the pieces.

bow closeup-480
Lastly, I added a lavender bow.

Products Used for this project

pazzle1 CTMH-d1540-in the background-200 CTMH a1153-hpe-200

tulip double-ppr-cf-200


Don’t forget to head over to SOUS and check out what the rest of the team created and join in the challenge! 

PLUS, they are currently having a Design Team Call TOO! So be sure to check it out! Be sure to come back tomorrow as I share another fun project! Until then,
2013 fall winter melsig-450