
Flap Box Tutorial


Supplies
One Piece of 12x12 PaperBone FolderAdhesiveEmbellishments as desired


1. Cut paper into an 8x8 square. Save the leftover 4x12 piece.
2. Fold paper in half. Use bone folder to make a good clean crease.

3. After folding, open paper up and fold in half the other way.
You should have four equal squares when this is done.


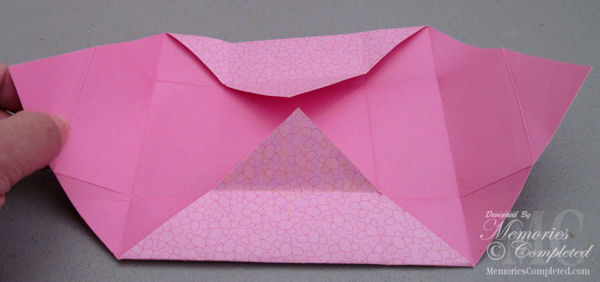


10.Push the points of the paper sides in where creases already exist. Doing this will make the open point want to go up.


12. The "point" will fold out to create another equal point on the bottom.

14. Once again, pushing the side creases in will make the flap go up.

15. Fold over and down into the bottom of the box.

16. Use bone folder to make good clean creases.

17. If done correctly, you will need just a very small amount of adhesives to keep the bottom points down. The box folds in such a way that adhesives on the sides are not necessary.
This is your completed box. Set it aside.
Instructions for the Flap
Cut your 4"x12" piece of paper to 4"x 8.5"


Score your 4"x8.5" paper at 3.5". Then turn it and score again at 3.5"

Adhere bottom of box to bottom of flap.

Adhere side of box to side of paper flap.

Your box construction is complete. Now just decorate and add goodies as desired!
Here is the same box with a lid.

Instructions for creating a lid
Flip the box over and measure the bottom. If the box bottom measures 3 x 3 then you will need to start with a piece of paper that is 6x6 for the top.
Flip the box over and measure the bottom. If the box bottom measures 3 x 3 then you will need to start with a piece of paper that is 6x6 for the top.
- Begin by folding the square in the same way that you do to create the box see steps 2-5 above then stop.
2. Now take the peak of your fold and fold it down to the edge of your outside fold. See photo above. Do this on all four sides.
3. Now take the outer edge fold and fold it up to the line or crease that is created when the peak flap is folded down. See photo. Do this on all four sides.
Once you have done this part, you can go back up to the box directions at step 8 to complete folding the lid. Just remember it is the same as folding the box only the "sides" will be shorter because of this step(photo above).
Making The Tower
Here is a tower where I made four of the standard (8x8) size boxes. I then took an 8x8 piece of paper and scored it at 3,6 and 9" to make four equal sides. I simply adhered each box on one panel at varying heights to create a stair step look. So as the tower opens each box's contents are accessible. The lid is the same as a regular box I only started with an 8.25 x 8.25 piece so that it would fit around the tower. Depending on the thickness of your paper you may need to up the lid paper size it to 8.5 x 8.5.


Here is the same box, stacked and covered to make a tower.
Hope you enjoyed the tutorial, please email me any photos of any boxes you make. I would LOVE to see them!
-Melin
Thanks for this tutorial, Melin. I'm not sure how to proceed with the box top = it seems to be left in the middle of the instructions?
ReplyDelete