Showing posts with label DCWV Butterfly Garden. Show all posts

17_01

Faith Journal Week 3 Hebrews 11-1

Happy Sunday crafty friends,
I missed last week’s faith journal post, so I want to catch up this week by sharing week 3 and then tomorrow I will share week 4.

So for week 3, the 15th through the 21st, our scripture reading was Hebrews 11.  This truly is one of my all time favorite passages. It is filled with such hope, inspiration and encouragement!  Here is my art page.
Faith Journal Hebrews 11 Art Page Martha Stewart Butterfly Punch
Here’s a look at what I created for this week. I started with a base of patterned paper from the DCWV Butterfly Garden Stack. I used a couple different pages from the stack. I fussy cut the label and layered it onto the butterfly paper.

Faith Journal Hebrews 11 Art Page Martha Stewart Butterfly Punch
Here’s a look at the little butterflies I added. I used a Martha Stewart punch and some of the Butterfly Garden Paper. I added some sparkle using my Spectrum Noir Glitter Marker Pen.

Faith Journal Hebrews 11 Art Page Martha Stewart Butterfly Punch
Here’s one of the other butterfly punches I used. I wanted a variety of butterflies.

Faith Journal Hebrews 11 Art Page Martha Stewart Butterfly Punch
Here’s a closer look at the digital image I made. I inked the edges of it to knock back the starkness of the white.

Faith Journal Hebrews 11 Art Page Martha Stewart Butterfly Punch
Here’s a closer look at the green butterfly. I used my Martha Stewart punch and then also used my Spectrum Noir Glitter pen to add a little sparkle.
Faith Journal Hebrews 11 Art Page Melinda Beltran
Here’s one last look at my completed page. 

Supplies Used
Martha Stewart Butterfly Punches-3 different ones

hebrews 11-1 digi set-650
UPDATE: FREE PRINTABLES can be found 
by joining my Facebook Group. CLICK HERE

Be sure to stop back by tomorrow when I catch up and share week 4’s art journal page.
If you would like to join the faith journal group and see all the other beautiful pages people are creating, just head over to the group HERE
faith journal logo

As always, thank you so much for stopping by and sharing your crafty time with me.
 Please be sure to take a moment and follow my blog! I sure would appreciate it! You can click the follow button on the right column. You can also follow me on:


Until the next time, have a wonderfully crafty day!

Discover Creative Freedom 300x250

Don't Forget To Sign Up For My Newsletter To Receive
The Subscriber Only FREEBIES and other exclusive info!


DCWV Butterfly Garden and Pazzles Floral and Gold Birthday Card

Hello crafty friends,

So glad you stopped by!
Side note: This was supposed to post yesterday but apparently I didn't set it up right. So sorry about that. Please bare with me as I shake the dust off my blogging skills...lol!

Today I am sharing a pretty, floral, soft pink and gold card I created.


DCWV Butterfly Garden SVG Cut File Card
Here’s a look at my completed card. The finished size is 5x6.5. I started by using a file set I created exclusively for the Pazzles Craft Room. If you are a member of the craft room then you can download this for free as part of your membership. If not, you may want to consider joining. All of their files are in SVG format so they will work on most craft cutters and not just the Pazzles!

DCWV Butterfly Garden SVG Cut File Card
Here’s a closer look at the different layers. The papers are from the DCWV Butterfly Garden Stack. The rest of the paper is white cardstock.  This shot also shows how I used some foam tape underneath the layers to give them a little lift. Like one of the designers I follow says, “When in doubt….pop it out”!

Paper Flowers SVG Cut Files
You can see in this photo, my flowers and leaves all started as plain white cardstock. I inked the edges of them to add just a touch of soft color. I used the Martha Stewart Chalk inks pad set.  For the center die cut, I used my CTMH Slate ink pad and a sentiment from a retired CTMH stamp set to stamp the sentiment. I also inked the edge of the die cut with more of the light pink ink from the Martha Stewart Chalk Inks. You can see I added a couple of pearl stickers from Paper Studio.

DCWV Butterfly Garden Stack Card
For the centers of the flowers, I used some Tsukineko Galaxy Gold ink to ink the little die cut and then used a gold sequin and a little dot of Bisque liquid pearls.  For the corner die cut, I used the same Tsukineko Galaxy Gold ink pad as it was also cut in plain white cardstock.

DCWV Butterfly Garden Stack Card
Here is one last look at the completed card. I hope my recipient will like it. 

Supplies Used
Foam Tape

As always, thank you so much for stopping by and sharing your crafty time with me. Please do me a favor and follow my blog. Just click the follow button towards the top right and follow along. You can click the follow button on the right column. I would appreciate it very, very much.
You can also follow me over at:

or My YOUTUBE Channel

Until the next time, have a wonderfully crafty day!


Discover Creative Freedom 300x250

Don't Forget To Sign Up For My Newsletter To Receive
The Subscriber Only FREEBIES and other exclusive info!


14_04

Springs Of Living Water Pazzles Craft Room Layout and Card

Hello crafty friends, 
Today I am sharing a layout I created with a spring theme for my Pazzles Design Team. I know so many can't wait for spring to get here. It has been a long, cold winter. So I made this layout with my brother and sister in law in mind. They recently moved up north and have endured leaving behind sunshine and flip flops to one of the harshest and coldest winters in recent memory. :-(


I cut the flowers and leaves and inked their edges for a little dimension. I like laying out everything in my software before I cut and or cut and print so I know exactly what size everything needs to be. I used the beautiful DCWV Butterfly Garden paper for the background. That one piece of paper really adds so much life to the background. I love that some of the papers in each stack are like this. Perfect really! I used the following Pazzles craft room files.


I then used my software to type set the scriptures as well as the title. I printed them out and then cut them with my pazzles. I was even able to lay out my picture and save ink by using my software to layout an oval and a white mat around the picture so that when I printed out the picture only the oval part of the picture would actually print. 

Here’s a screen shot to show you what I mean. I simply made the “grey” frame all white when printing. I made it gray in this screen shot to show you.


Here’s what it looked like when I was ready to print.


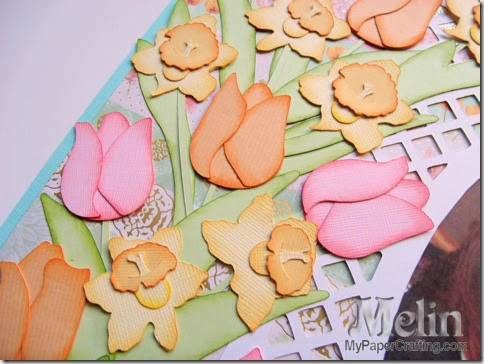
Here's a closer look at the pretty flowers. I cut them and then inked them with the various inks in the Adventure ink pad set from Close To My Heart.


Here’s a closer look at the title. I simply set the words in a circle and then did a print n’ cut in my pazzles….easy peasy


Here is a closer look at one of the two scriptures. I used the Tulip flourish file. I did weld some of the pieces together from the original file so that it would cut in one continuous piece. I wanted to use the file this way and the separated pieces wouldn't have worked.

In case you can’t read the scripture. I used Isaiah 58:11
And the Lord will continually guide you, 
And satisfy your desire in scorched places, 
And give strength to your bones; 
And you will be like a watered garden, 
And like a spring of water whose waters do not fail.


Here is the second scripture I used: Jeremiah 33:15
In those days and at that time I will cause a righteous Branch of David to spring forth; and He shall execute justice and righteousness on the earth.


Personal note: I used these scriptures because they spoke so strongly about my beloved brother and his family. As I said before, they recently moved to a different part of the country and it has been such a change. I miss them being around the corner so as I was creating this layout, I thought these two scriptures really speak of them and their lives. So to Dave and Tanya, I sure do miss you and the family  (big puddle of tears under the happy face).


Additional supplies

White, Teal, Tangerine, Pink, Yellow and Sunbeam Cardstock.
Kraft cardstock from Hobby Lobby for card below
Misc. Ribbon for card below.


As I was cutting out all of my flower pieces, I had plenty of extra pieces, so I decided to create this card


Once again I used some of the same pretty DCWV Butterfly Garden paper stack for the background. I used some kraft paper for the base and then did the same inking on the various flower pieces. I finished off the bottom with some pretty lavender iridescent ribbon and a little pearl in the center. There is no sentiment on this yet because I wasn’t sure what I would be using it for….Passover, general hello or for a possible spring birthday card…anyway…waste not want not so it is ready to go

Lastly, I wanted to share the scriptures and title I made. The download includes each one in 300 dpi jpg format. 


Free until 4-9-14

Well, I think that about covers it for today. Be sure to head over to the Pazzles Craft Room and check out the thousands of files available for every project under the sun! Thank you so much for sharing your crafty time with me!


14_03

DCWV March Stackaholic Challenge Card AND Freebies!

Hello crafty friends,
Hope you are having a great day and wrapping up your week. Today I am sharing a card I made for the DCWV Die Cuts With A View Monthly Stackaholic Challenge. Each month they have a challenge and typically feature a card and layout sketch. I shared my layout project for this month: HERE. Today I am sharing my card challenge plus I am sharing a couple of freebies! So let’s get started.

smile card-480
Here’s a look at my card. I used a Pazzles Craft Room FREEBIE (SEE LINK BELOW)from the Miss Kate’s Cuttables collection. I took the scallop base, welded two together to create the card base. Cut that out of some Kraft paper from Hobby Lobby The Paper Studio. I followed the sketch provided by the challenge. I used some pretty patterned papers from the DCWV Die Cuts With A View Butterfly Garden Stack.
march card sketch

smile-card-side-view-480
Next, I made a Print N’ Cut file with the sentiment and flower. It was my first attempt at a print n’ cut file and I think it came out pretty good. I added a couple of tiny brads on each end of the sentiment strip. I added a cute button with some twine to the center of the flower. I inked the edges of all my paper layers and added some pop dots to the different layers to give them a nice staggered look with some depth. Finally I added some pearl embellishments to the outer edge.

smile card v2-480
Here is one more look at my card.

Products Used For This Project
pazzle1
Pazzles Inspiration
dcwv butterfly garden
smile flower PNC-ppr-325
PCW Smile Flower Print N’ Cut File
mk-spring-flowers-200

Z2503-basics
hb pearls
Hobby Lobby Spare Parts Pearl Gems
kraft 8.5x11
white cardstock-458729-155

doodlebug-twine-assortment
Doodlebug
Paradise Twine
QCLOVE brads
Queen & Co Love Brads Assortment
crafty foam tape
tape glider

Now For The Freebies!
mk-spring-flowers-350
Here is the FREE SVG cut file from the Pazzles Craft Room


Once you are there, click the library tab on the menu bar and then click on the free cutting files folder. There you will see this file as well as several others you can download.


Smile-Flower Print N’ Cut File Freebie
smile flower PNC-ppr-325
Available Formats: SVG, STUDIO, WPC, PNG and JPG 
**UPDATE**
*Head to my FB Page
*Like my FB Page

*Click the tab on the menu that says"MyTab-Friend Stuff"
*Click the image you see and it will take you to the download page
So sorry for any confusion.
 This is my first attempt at a print n’ cut file and would love your feedback. Either here or on my fb page. 

I think that about covers it for today. As always, thank you so much for sharing some of your crafty time with me. Be sure to stop back by Sunday late afternoon as I will be sharing a project for the Scrapyland Online crop. Until then,
2013 fall winter melsig-450